
Effortless Crafting: Quick Tips for Seamless Plush Assembly
- Rebekah Bowen

- Apr 27
- 3 min read
Crocheting is a rewarding hobby that lets you create cozy, beautiful items with your own hands. Yet, one part of the process often slows down the joy: sewing pieces together. Extra sewing can feel tedious and time-consuming, pulling you away from the fun of crafting. What if you could say goodbye to extra sewing and hello to seamless crafting? This post shares a quick tip designed for easy assembly, helping you spend more time enjoying your crochet projects and less time stitching them together.

Why Seamless Assembly Matters
When you finish crocheting individual pieces, like plush the next step is sewing on the different pieces, such as arms, legs, noses, ect..., using the traditional sewing method of threading needles, aligning pieces carefully, and stitching them in the right place. This can be frustrating, especially if you want your project to look neat and professional.
Seamless assembly techniques eliminate the tediousness of traditional hand sewing. This means your finished piece looks neater, better alignment, and holds together better. Plus, it cuts down on the time you spend sewing, so you can focus on what you love: creating.
The Quick Tip for Easy Crochet Assembly
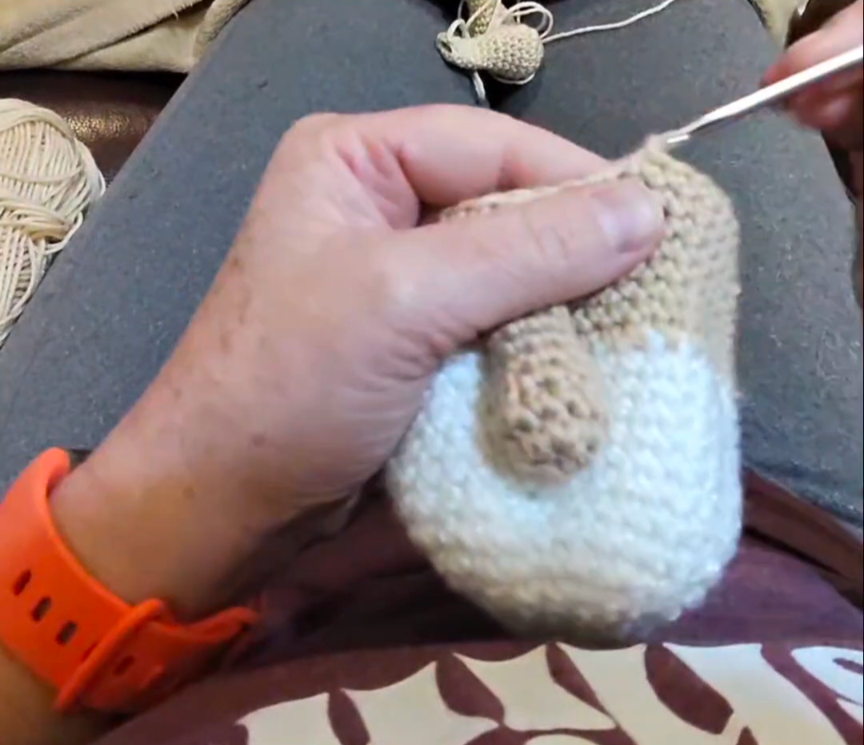
The key to seamless assembly lies in joining your pieces as you crochet, rather than after. This method is often called join-as-you-go (JAYG). Instead of finishing the main body of your plush and then sewing them, you connect each new piece directly to the previous round as you crochet.
This method can be used to attach any part directly to the main body of your plush. You have the option to pinch the two sides of the piece you are joining together and crochet through both simultaneously, or you can first crochet across the bottom stitches and then crochet across the top stitches of the piece in the next row. To achieve this, keep the current loop on your hook, insert the hook through the chosen stitch of the piece you're attaching, and then through the next stitch on the body. Repeat this process until you have crocheted across all the stitches of the piece you are joining.
In the video demonstrating how to attach the arms, you'll observe me crocheting through both sides simultaneously to secure them to the body. In the video for the nose, you'll discover how to crochet across the bottom first, followed by the top.
Watch the video below to learn how to apply this technique in your next project:
How to attach arms
How to attach a nose
Benefits of Join-As-You-Go
Saves time by combining joining and crocheting steps.
Improves durability because the pieces are connected securely.
Enhances appearance with neat, invisible joins.
Reduces frustration from sewing and pinning pieces together.
Troubleshooting Common Issues
Edges don’t line up: Count stitches carefully before joining. Use stitch markers to match corners.
Seams look bulky: Use smaller hook sizes for joining rounds or try slip stitches instead of single crochet.
Joining feels tight: Loosen your tension slightly on the joining round to keep fabric flexible.
Final Thoughts on Seamless Crochet Assembly
Seamless crochet assembly transforms your crafting experience. By using the join-as-you-go method, you reduce extra sewing, speed up your projects, and create polished, professional-looking pieces. This quick tip helps you focus on the joy of making, not the hassle of stitching.
Try this technique on your next project and see how much easier and more enjoyable crochet assembly can be. Your cozy creations will come to life faster, with smooth joins that feel as good as they look.
#BloggingTheMoon #CrochetTipsAndTricks #JoinAsYouGoMethod #TheCrochetedMoon #HandmadeWithLuv #CMcrochetLifestyle


Comments