Search Results
101 results found with an empty search
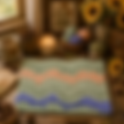
- Stitching the Last Days of Summer: Rippled Ruffles Pattern
A chevron ripple has a way of making simple stitches look alive. The rises and dips pull the eye across the fabric, almost like water moving under a light breeze or low hills stretching into the distance. For August, that motion feels especially right. The month sits between seasons. It still carries the warmth of summer, but the evenings start to soften. A ripple worked in sage, peach, and twilight blue captures that shift beautifully. Sage brings the calm, leafy base. Peach adds sunset warmth. Twilight blue gives the piece depth, like shade settling into the edges of a late day. The stitch does the shaping, while the palette gives it mood. If you’re planning an August Crochet Pattern with a gentle seasonal feel, this combination is a lovely place to start. Soft August colors make the ripple movement easy to see. Why the rippled ruffle feels right for August Chevron ripple crochet is built on repetition. Peaks rise, valleys dip, and the rows keep moving. That rhythm is what gives the fabric its wave-like shape. In brighter colors, a ripple can feel bold and playful. In softer natural shades, it becomes quieter. Sage, peach, and twilight blue make the pattern feel organic instead of graphic. The lines are still clear, but they don’t shout. That makes the palette especially suited to August. The sage feels fresh without looking springy. It has that soft foliage quality, like herbs in a kitchen window or leaves turning slightly dusty after weeks of sun. Peach brings warmth without becoming orange or loud. It suggests ripened fruit, warm skies, and the last golden hours of summer. Twilight blue cools the whole thing down. It adds shadow, which keeps the palette from feeling too sweet. Together, the three shades create a transitional piece. It doesn’t belong only to summer or fall. It sits in that in-between space, which is exactly where August lives. A ripple stitch also suits this seasonal feeling because it never sits completely still. Even when the item is folded over a chair, the pattern keeps moving. The eye follows one stripe into the next, which makes the finished piece feel relaxed and handmade in the best way. How the three colors work together The success of this palette comes from balance. Each color has a clear job, and none of them needs to dominate the whole project. Color Feeling it brings Best use in the ripple Sage Calm, earthy, grounded Use as a base color or repeat often Peach Warm, soft, sunlit Use as a glow between cooler rows Twilight blue Deep, restful, shadowed Use to create contrast and rhythm Sage is the anchor. If the piece uses more sage than the other two colors, it will feel peaceful and nature-led. That’s a good choice for a throw blanket, nursery blanket, or anything meant to live in a calm room. Peach is the light source. A little peach goes a long way because the eye notices warmth quickly. It can brighten the ripple peaks and keep the project from looking too cool. Twilight blue is the depth. It gives the whole design a sense of evening. Without it, sage and peach can feel airy and soft, but maybe a little flat. The blue adds contrast and helps define the waves. That mix is why the ripple texture matters. The colors don’t sit in blocks. They move through peaks and valleys, which makes the shades feel connected rather than stacked. The peaks and valleys are what give chevron ripple crochet its flowing character. Choosing yarn that shows off the ripple A ripple pattern looks best when the stitches have enough definition to show the shape. The yarn doesn’t need to be fancy, but it should support the texture. For most home projects, a smooth worsted weight yarn is a safe choice. It works up at a comfortable pace, shows the chevron shape clearly, and holds up well for blankets and everyday use. DK weight gives a lighter, softer drape, which can be lovely for scarves, wraps, and baby items. Bulky yarn can work too, but the peaks and valleys become larger and more dramatic. Fiber matters too. Cotton gives a crisp ripple. It’s great for table runners, dish towels, and warm-weather pieces. Acrylic is easy-care, affordable, and practical for throws that will get plenty of use. Wool and wool blends add warmth and bounce, which makes the ripple feel soft and full. If the goal is a relaxed August piece, look for yarns with a matte or softly heathered finish. A high-shine yarn can make the palette feel more polished, while a softer finish keeps it grounded. Before starting a large project, make a small swatch with all three colors. Ripple stitches can change how colors feel once they start zigzagging. A peach that looks gentle in the skein may read much brighter when placed between sage and blue. A twilight blue that looks dark in a ball may soften once it repeats across rows. A swatch also helps with hook size. If the ripple feels stiff, go up a hook size. If the valleys look loose or uneven, go down slightly or pay closer attention to tension at the decreases. For a cozy blanket, the fabric should bend easily in your hands. For a table runner or decorative piece, a little firmness can help the ripple hold its shape. Stitch details that make the ripple cleaner Chevron ripple crochet usually depends on increases and decreases placed in the same spots on every row. Those increases create the peaks. The decreases create the valleys. Once the pattern is established, the work becomes pleasantly repetitive. The key is consistency. Stitching details make a clean looking ripple pattern. If one row has an extra stitch, the peak can shift. If a decrease is missed, the valley may look soft or uneven. That doesn’t mean the piece is ruined, but it’s easier to fix early than later. Use stitch markers if the repeat is new. Mark the first few peaks and valleys until the rhythm starts to make sense. After several rows, the shape usually becomes easier to read because the stitches tell you where to place the next increase or decrease. Tension also matters at the turning chain. Ripple edges can start to pull inward if the first and last stitches are worked too tightly. Try to keep edge stitches relaxed, especially if the project will have a border. Color changes need a little care too. For clean stripes, change color on the final yarn-over of the last stitch in the row. That way the new color is ready when the next row begins. Keep the tails long enough to weave in securely, especially on blankets that will be washed. A border can finish the piece nicely, but it shouldn’t fight the ripple. A simple single crochet border often works well. You can use sage for a soft frame, twilight blue for definition, or peach for a warmer edge. If the ripple edge is part of the charm, leave the top and bottom zigzag edges visible and only tidy the sides. Project ideas for this palette A crochet lifestyle involves designing a cohesive theme and crafting a style that you can incorporate into both your home and wardrobe. 🌿 Crochet Creations Blankets — the classic use; the waves look stunning draped over a bed or sofa, especially in seasonal hues. Table runners — the undulating stripes add a handmade charm to rustic or cottagecore tablescapes. Tote bags — use the ripple as a front panel for a textured, eye‑catching accessory. Pillow covers — perfect for layering in your workspace or reading nook. Scarves or wraps — the waves create a natural drape and visual rhythm. Seat cushions — cozy and tactile, especially in your cottagecore workspace. 🌻 Seasonal Styling Ideas Pair the sage, peach, and twilight blue with sunflower yellows, acorn browns, and cream neutrals for a cohesive late‑summer look. You could even add embroidered motifs—tiny acorns or petals—to tie the theme together. A gentle finish for late summer making The August Rippled Chevron works because the stitch and colors are telling the same story. The ripple brings movement. Sage keeps it calm. Peach adds the last glow of summer. Twilight blue cools the edges and hints at the season ahead. If you’re starting one, keep the plan simple at first. Choose a smooth yarn, make a small swatch, and test a stripe sequence before committing to the full piece. That’s the charm of this combination. It feels handmade, seasonal, and easy to live with. Like August itself, it holds warmth and shadow in the same row. #BloggingTheMoon #LearnNewStitches #RippledRufflesPattern #TheCrochetedMoon #HandmadeWithLuv #CMcrochetLifestyle Rippled Ruffles Pattern
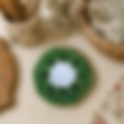
- Kiwi Kitchen Scrubber for Cottagecore Charm
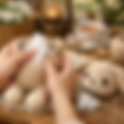
A sink full of dishes feels a little less annoying when the tool in your hand looks like a slice of kiwi. There’s something irresistibly charming about a handmade kitchen companion — especially one shaped like a plump, fuzzy kiwi fruit. The Kiwi Kitchen Scrubber is part whimsy, part practicality, and entirely infused with that Crocheted Moon magic you’ve woven into your brand from the beginning. This tiny fruit friend is designed to make everyday chores feel lighter, brighter, and a little more enchanted. Whether it’s perched beside the sink or sudsing up a stubborn pan, the Kiwi Scrubber brings a playful spirit to the most ordinary moments. The Kiwi Kitchen Scrubber from The Crocheted Moon A Scrubber with Personality The Kiwi Kitchen Scrubber is crafted with the same thoughtful design I use across all my fruity helpers. Its rounded shape fits comfortably in the hand, making it easy to wiggle into corners and glide across surfaces. The textured stitches give it just enough scrubbing power for everyday messes, while still being gentle on cookware. And of course — the signature kiwi “fuzz” is what makes this little scrubber truly shine. It’s soft, silly, and instantly recognizable, turning a simple cleaning tool into a tiny character with charm. Inspired by Nature’s Palette This palette reflects everything the Kiwi Scrubber embodies: Deep black — the grounding seeds, the tiny details that make the kiwi instantly identifiable. Bright white — the clean, fresh interior of the fruit, a nod to the scrubber’s purpose. Shimmering green — the fuzzy, playful exterior that gives the kiwi its personality and makes your scrubber so delightful. Sketch of the kiwi scrubber Together, these textures and tones create a visual story that feels fresh, natural, and a little mischievous — exactly the vibe your brand thrives on. Kiwi scrubber mood board The design is whimsical without being fussy A lot of decorative kitchen items look nice but get annoying fast. They’re hard to clean, too delicate to use, or better suited to a shelf than a sink. The Kiwi Kitchen Scrubber avoids that problem because it stays simple. The shape is round. The size is easy to handle. The kiwi design comes from stitched details, not extra pieces that get in the way. That matters because dishwashing tools need to be used, squeezed, rinsed, and hung or laid flat to dry. The kiwi theme also lands in a nice middle place. It’s playful, but not childish. It adds cottagecore charm, but it doesn’t overwhelm the kitchen. It could sit beside a farmhouse-style soap dispenser, a modern white sink, a colorful tiled backsplash, or a collection of vintage dishes and still make sense. If you like seasonal decorating, it also works year-round. It feels fresh in spring, cheerful in summer, cozy in fall, and bright during winter when the kitchen could use a bit of color. How it performs for everyday dishwashing The main question with any cute cleaning tool is simple. Does it actually work? For daily kitchen messes, the Kiwi Kitchen Scrubber is built to be useful. The durable crochet texture helps with common dishwashing jobs such as: Scrubbing plates after dinner Cleaning mugs and glasses Washing pots and pans Wiping food residue from bowls Giving the sink a quick tidy after cooking The scrub fibers give it more grip than a plain cloth, while still feeling gentler than a harsh scouring pad. That makes it a good choice for routine cleanup, especially when you don’t need a heavy-duty abrasive tool. Use the kiwi scrubber on your pots and pans For stuck-on food, soaking still helps. A handmade scrubby can do a lot, but it won’t magically replace every tool in the kitchen. Burned-on sauce, baked cheese, or hardened oatmeal may still need hot water, dish soap, patience, and a firmer scrubber. That’s normal. The best use case is regular dishwashing and light to medium scrubbing. It’s the scrubby you reach for most days, not necessarily the one you use on the worst pan in the house. For delicate cookware or specialty finishes, it’s smart to test gently first. Most everyday dishes can handle a textured scrubby just fine, but some surfaces need extra care. If you already follow special care instructions for a pan, keep doing that. Handmade, Durable, and Delightfully Practical Like all Crocheted Moon creations, the Kiwi Kitchen Scrubber is: Hand‑crafted with care Durable enough for daily use Machine‑washable (because even magical fruit friends need a bath) Eco‑friendly, replacing disposable sponges with something reusable and charming It’s the kind of product that makes customers smile the moment they see it — and again every time they reach for it at the sink. Care step What to do Washing Machine wash cold Drying Dry flat Ironing Do not iron Bleach Do not bleach Dry cleaning Do not dry clean Hang your kiwi scrubber up to air dry The dry-flat step is the one to remember. After washing, reshape it gently if needed and lay it flat until it’s dry. That helps protect the crocheted shape and keeps the kiwi slice looking tidy. For day-to-day use, rinse it well after dishes and place it somewhere it can air out. A soap dish with drainage, a small rack, or the edge of the sink can work. Avoid leaving it crumpled in a wet basin, since any reusable scrubber will last better when it can dry between uses. A Perfect Gift or Everyday Treat Whether tucked into a housewarming basket, paired with our Pineapple or Watermelon scrubber, or purchased as a little treat for someone who loves handmade whimsy, the Kiwi Scrubber is a crowd‑pleaser. It’s functional, adorable, and unmistakably The Crocheted Moon. Add a touch of coziness to your gift basket with a delightful booklet containing an all-natural and safe recipe for a homemade cleaner. Click on the downloadable PDF to include it now. The kiwi scrubber makes a heartwarming gift The verdict The Kiwi Kitchen Scrubber is a lovely fit for anyone who wants their kitchen tools to feel more personal. It’s practical enough for everyday dishwashing, cute enough to leave out by the sink, and simple enough to care for without fuss. Its strongest feature is the balance between function and charm. The crochet texture gives it real cleaning use, while the kiwi slice design brings warmth to a space that often gets overlooked. At 5 inches wide, it has a comfortable size for regular dishes, pots, and pans. The reusable, quick-dry material also makes it a more thoughtful choice than constantly reaching for disposable scrub pads. The only thing to keep in mind is that it’s best for everyday cleaning, not the most stubborn burned-on messes. That’s not a flaw so much as a sensible boundary. Most kitchens need more than one type of cleaning tool anyway. If the sink area could use a little handmade joy, this scrubby is an easy place to start. Chores may still be chores, but a kiwi-shaped crochet scrubber makes them feel a bit cozier. #BloggingTheMoon #WhatsNew #KitchenHelpers #KiwiKitchenScrubber #TheCrochetedMoon #HandmadeWithLuv #CMcrochetLifestyle
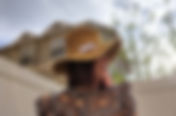
- The Secret to Perfectly Shaped Crochet Hat Brims: Galvanized Wire Magic
Crocheted hats — especially whimsical witch hats, wizard hats, sun hats, and cottagecore brims — have a personality all their own. They slouch, they swoop, they curl, they tilt. But if you’ve ever tried to coax a brim into holding a crisp curve or a dramatic swoop, you already know the truth: yarn alone doesn’t always obey. That’s where one of the most underrated tools in the crochet world steps in like a quiet hero. Galvanized wire helps your hat brim hold it's shape. Galvanized wire This simple material, often found in hardware aisles rather than craft stores, can transform your hat brims from “soft and floppy” to structured, sculptural, and enchantingly stable — without sacrificing the handmade charm of your stitches. 16mm galvanized wire Whether you’re crafting a witch’s hat for your Enchanted Brim Collection, a wizard’s hat for imaginative play, or a summer sun hat with a cottagecore twist, galvanized wire gives your brim the backbone it needs to hold its shape beautifully. Let’s dive deep into how it works, why it’s magical, and how you can use it safely and effectively in your own crochet creations. Why Galvanized Wire Works So Well for Crochet Brims Galvanized wire is steel wire coated in zinc to prevent rusting. It’s strong, flexible, and surprisingly lightweight — a perfect combination for shaping crochet projects. Here’s why crocheters love it: It flexible and holds its shape. It’s durable, so your hat won’t lose its structure over time. It’s rust‑resistant, making it safe for wear, storage, and outdoor photoshoots. It’s thin enough to hide inside a brim without adding bulk. It’s inexpensive, especially compared to specialty millinery wire. In short: it’s the closest thing to giving your hat a skeleton — a gentle, supportive one that lets your stitches shine. Where Galvanized Wire Makes the Biggest Difference 1. Witch Hats & Wizard Hats These hats often have dramatic brims — curled edges, swooping points, or structured silhouettes. Without support, they can look limp or lose their shape after a few wears. Galvanized wire lets you create: A brim that curls upward like a mischievous grin A brim that dips down in front for a mysterious shadow A perfectly round brim that stays crisp and even A sculptural silhouette that looks magical from every angle 2. Sun Hats Wide brims need structure to avoid flopping into the wearer’s face. Wire helps maintain: Gentle curves Wide, even circles Elegant swoops Cottagecore‑style silhouettes 3. Costume & Fantasy Hats For imaginative play, photoshoots, or themed collections, wire lets you exaggerate shapes in ways yarn alone can’t. Choosing the Right Wire Gauge Wire comes in different thicknesses, known as “gauges.” The lower the number, the thicker the wire. For crochet hat brims, the sweet spot is usually: 16–18 gauge for average sized projects created with a worsted (#4) yarn. 20–22 gauge for smaller hats or subtle shaping You want something that bends easily but doesn’t collapse under the weight of the yarn. If you’re unsure, start with 16 gauge — it’s the most versatile for crochet hats. Encasing the Wire Inside the Final Round There are other methods but this is the one I found to work the best and prefer the most. How it works: Crochet your brim to its full size. Cut a piece of galvanized wire long enough to circle the brim, plus 1–2 inches for overlap. Wrap green floral tape around each of the over lapping wire ends. Hold the wire against the brim’s edge. Crochet one final round over the wire, encasing it inside your stitches. Best for: Witch hats Sun hats Any brim that needs a smooth, uninterrupted edge Tips: Use single crochet for the encasing round — they grip the wire well. Keep your tension consistent so the wire doesn’t peek through. Safety Tips When Working With Wire Use the proper tools to cut your galvanized wire Galvanized wire is safe to use, but a few precautions make the process smoother: Use wire cutters, not scissors — scissors can be damaged . Bend the ends into loops so they don’t poke through your stitches. Wrap the joined ends with electrical tape or floral tape for extra security. Avoid extremely thin wire, which can kink or break. Store wire safely, especially around kids or pets. Troubleshooting Common Issues The wire is visible through the stitches. Use a thicker yarn or add one more encasing round. The brim looks uneven. Check that your wire ring is perfectly round before encasing it. The brim feels too stiff. Try a thinner gauge wire next time. The brim won’t hold dramatic shapes. Use 16–18 gauge wire and reinforce with a second wire channel. Final Thoughts If you’ve never used galvanized wire in your crochet hat brims before, consider this your Add galvanized wire to brim to keep looking beautiful invitation. It’s simple, accessible, and transformative — a tool that elevates your craftsmanship without complicating your process. Your stitches stay yours. Your artistry stays yours. The wire simply helps your vision stand tall. Whether you’re shaping a witch’s hat, a wizard’s hat, a sun hat, or a whimsical cottagecore brim, galvanized wire gives your creations the structure they deserve — and the magic you imagined when you first picked up your hook. #BloggingTheMoon #CrochetTipsAndTricks #GalvanizedHero #TheCrochetedMoon #HandmadeWithLuv #CMcrochetLifestyle
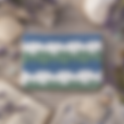
- Celebrating the Natural Beauty of the Ocean with a Handcrafted Wave Pattern
The ocean’s calm and rhythmic waves inspire countless artists and makers. This crochet piece captures that essence through a unique pattern of interlocking rounded-triangular motifs. The design creates a soft, sculptural chevron effect that feels both modern and timeless. Using a palette of dusky blue, crisp white, and spa green, the piece reflects the soothing colors of the seaside. The raised stitches add texture and depth, making the fabric tactile and visually engaging. This handcrafted panel is more than just a decorative item. It serves as a statement swatch for custom orders, a design sample for blankets or scarves, and a display piece showcasing skillful stitchwork and color harmony. Its soft structure and striking appearance bring a touch of handmade artistry to any space. Handcrafted crochet panel with ocean-inspired wave pattern The Inspiration Behind the Endless Wave Pattern Coastal cottage inspires the wave pattern The ocean’s natural rhythm and colors provide a rich source of inspiration for this crochet design. The rounded-triangular motifs mimic the gentle rise and fall of waves, creating a chevron pattern that flows across the panel. This sculptural effect adds a three-dimensional quality, inviting touch and closer inspection. Choosing dusky blue, crisp white, and spa green was intentional. These colors evoke the sea, foam, and coastal greenery, grounding the piece in a natural palette. The combination feels fresh yet timeless, suitable for a variety of settings from modern interiors to cozy beach cottages. Crafting Texture and Dimension with Raised Stitches Touchable wave pattern The raised stitches are key to the panel’s tactile appeal. Each peak and valley catches light differently, emphasizing the craftsmanship behind every loop. This technique adds depth without bulk, making the fabric soft but structured. Working with raised stitches requires careful attention to tension and stitch placement. The result is a fabric that invites touch and adds visual interest beyond flat crochet. This texture makes the panel versatile for different uses, from decorative accents to functional textiles. Practical Uses for the Crochet Pattern Design a coordinated home decor collection: Floor Mat The raised texture gives gentle cushioning underfoot, while the alternating colors evoke seafoam and shoreline layers. Framed by a neat blue border, the mat would look beautiful beside a porch door, bathroom vanity, or reading nook, adding handmade warmth and coastal calm to the room. Cozy Throw The alternating colors bring a soothing coastal palette — seafoam, sky, and driftwood tones — perfect for a cottagecore or seaside retreat. Its three‑dimensional stitchwork gives the throw a plush, inviting feel, ideal for layering over linen or suede textures. It would look beautiful folded at the foot of a bed or draped casually over a chair, adding handmade charm and a touch of ocean calm to any space. Peaceful Pillows The blue, white, and green palette feels fresh and coastal, but still cozy enough for a cottagecore nook. Because the stitches are raised and dimensional, the pillow would have that irresistible “reach out and touch it” texture — plush, structured, and full of handmade charm. Framed with the neat blue edging, it would look perfect on a porch swing, reading chair, or layered on a bed, adding a little pocket of ocean calm wherever it rests. Tips for Incorporating This Pattern into Your Projects If you want to create your own version of this wave pattern, here are some practical tips: Choose yarn colors inspired by nature Select hues that complement each other and reflect the mood you want to evoke. The seaside palette works well for calm, refreshing designs. Summer sweater created with the wave pattern Plan your color transitions carefully Changing colors at the right points enhances the chevron effect and keeps the pattern clean and defined. Use the panel as a modular piece Combine multiple panels for larger projects like blankets or wall hangings, maintaining the rhythm and flow of the wave pattern. These steps help you bring the natural beauty of the ocean into your handmade creations with skill and style. Final Thoughts on Setting the Mood The wave pattern has a soft structure and visual impact making it a standout piece that adds warmth, personality, and sets the mood of any space. Want a light breezy mood? Use soft pastel colors. Want to bring the natural beauty and calm of the ocean into your space? Keep the medium blues, spa or seafoam greens, and crip whites. Want a deep sensual mood like the sea after a storm? Change the colors to darker muted blues and greens accented with cream or a beige. Make it a refelction of you and love the space you're in! #BloggingTheMoon #LearnNewStitches #EndlessWavePattern #TheCrochetedMoon #HandmadeWithLuv #CMcrochetLifestyle Endless Wave Pattern How to Crochet Row 2 How to video for the Endless Wave Pattern, Row 2 How to Crochet Row 4 How to video for the Endless Wave Pattern, Row 4
- Celebrate Every Side of Dad with the Playful Makeover of Father "Gnomes" Best
Father figures often wear many hats. They are the heroes who fix what’s broken, the coaches who cheer us on, the snack providers during late-night cravings, and the ones who insist they’re “not crying, there’s just something in their eye.” Capturing all these sides in one thoughtful gift can be a challenge. That’s where the newly redesigned Father "Gnomes" Best steps in. This charming figure is more than just a decoration; it’s a playful, heartfelt tribute to every side of dad—even the squishy, soft-hearted one. Give Father Gnome as a special gift A Nod to Dad’s Many Roles The Father Gnome makeover celebrates the many roles dads play in everyday life. He’s the fixer who always has a tool in hand, the coach who motivates with patience, and the snack provider who knows exactly when you need a bite. This gnome captures those qualities with a wink and a smile. The Hero: The gnome’s quiet, confident figure and his classic mustache symbolize the quiet strength dads show. The Fixer: His practical espresso brown trousers feature a small pocket, perfect for holding essentials like cash, gift cards, or even that crumpled receipt dad insists he still needs. The Coach: The variegated yarn tie, which can be tied just like dad’s own, adds a touch of effort and care. The Snack Provider: His cozy cotton shirt in muted moss reflects warmth and comfort, like the snacks he offers when you least expect it. This thoughtful design makes the Father Gnome a meaningful gift that shows you see every side of him. Style That Speaks to Dad’s Personality The makeover doesn’t just stop at symbolism. The Father Gnome’s outfit is carefully chosen to reflect a dad’s unique style and charm. Muted Moss Cotton Shirt: This soft, earthy tone is both calming and stylish. The tiny lapels add a subtle touch of class without being over the top. Variegated Yarn Tie: Unlike a stiff, formal tie, this yarn tie brings texture and color, echoing the natural tones of the shirt and trousers. It’s a playful nod to the dad who tries to look sharp, even if he’s not always perfect at tying a tie. Espresso Brown Trousers: These trousers ground the look with a rich, warm color. The small pocket is a clever detail that adds function and personality. Fabulous Mustache: The mustache is more than decoration; it’s a symbol of dad’s greatness and character, something he was born with and wears proudly. Together, these elements create a figure that feels both familiar and fresh, a perfect representation of the dad you know and love. Why the Father Gnome Makes a Great Gift Finding a gift that truly captures dad’s personality can be tricky. The Father Gnome stands out because it’s: Personal: It reflects the many sides of dad, from his practical nature to his softer moments . Playful: The design brings a smile and invites a lighthearted connection. Functional: The small pocket is a clever touch that adds usefulness to the figure. Father Gnome's secret pocket Stylish: The outfit is carefully designed to feel both classic and approachable. Specific Gift Card: Choose a gift card that aligns with his interests, whether it's for a favorite store, restaurant, or activity. Wallet-Sized Picture: A small picture of you that fits in the gnome's back pocket can add a personal touch and remind him of cherished moments. This gnome is perfect for Father’s Day, birthdays, or just because. It’s a way to say you see him—not just as a dad, but as a whole person with quirks, strengths, and a heart. How to Use the Father Gnome in Your Home The Father Gnome isn’t just a collectible; it’s a conversation starter and a piece of home decor that adds warmth. Place it on a bookshelf where it can catch the eye and remind everyone of dad’s presence. Keep it on a desk or workspace as a symbol of support and encouragement. Use it as a centerpiece during family gatherings to spark stories and smiles. Gift it with a handwritten note that highlights the qualities you appreciate most about your dad. This figure fits seamlessly into many spaces, making it a versatile and meaningful addition to any home. Father Gnome displayed on a wooden shelf surrounded by family photos Seeing Every Side of Dad Matters Dads often hide their emotions behind jokes or a tough exterior. The Father Gnome’s playful design acknowledges that it’s okay to be both strong and soft. It’s a reminder that dads have layers—heroes who fix things, coaches who guide, snack providers who care, and yes, even those moments when there’s “something in their eye.” This figure invites us to celebrate all those sides with warmth and humor. Giving this gnome is a way to say, “I see you, all of you,” and that message means more than any words alone. #BloggingTheMoon #CMExclusiveCollections #FatherGnomesBest #FatherGnomeMakeover #TheCrochetedMoon #HandmadeWithLuv #CMcrochetLifestyle
- How to Keep Your Crochet Rounds Perfectly Round with Simple Increases
Crocheting in rounds is a popular technique for making hats, doilies, coasters, and many other projects. But if you’ve ever noticed your rounds turning into a hexagonal shape instead of a smooth circle, you’re not alone. This happens because of the way increases are spaced around the round. Fortunately, there’s a simple trick to keep your rounds looking more perfectly round by adjusting how you place your increases. Crochet project with smooth round shape Why Crochet Rounds Become Hexagonal As you move into each new round, every increase is worked into the second stitch of the previous increase, which naturally gives your project a hexagonal shape. This shape is not necessarily wrong, but it can be undesirable if you want a perfectly round piece, especially for projects like hats or plush where a circular shape needed. The Trick to Keep Rounds More Circular The key to a rounder shape lies in how you space your increases. If the number of stitches between increases is an even number, you can split those stitches at the beginning and end of the round. If the number of stitches between increases is an odd number, you increase as you normally would. Alternating the rounds like this balances the increases and smooths out the corners. Example Pattern Adjustment Let’s say you increase your rounds by 6 stitches each time, this is the "split formula" as I call Crochet Round with and Even Number Count that will help you achieve the circular shape: ``` Example Odd stitch count: SC 4, inc repeat 6 times ``` ``` Example Even stitch count: SC 2, inc, SC 4, inc x 5, SC 2 ``` By following this formula on each round — keeping an even number of stitches between increases — you’ll distribute the increases more evenly throughout your work. The same principle applies when you’re decreasing. How to Apply This Trick to Your Projects Here are some practical steps to use this method in your own crochet rounds: Count your stitches between increases. Make sure the number is even to use the "split formula". Split the stitches evenly at the start and end of the round. For example, if you have 6 stitches between increases, crochet 3 stitches before the first increase and 3 stitches after the last increase. Keep track of your rounds carefully. Mark the beginning and end of your rounds to avoid confusion. Test with a small swatch. Before starting a large project, try this method on a small circle to see how it affects the shape. This approach works well for many types of crochet projects, including hats, bags, and circular blankets. Crochet hook working on round project with even stitch increases When to Use This Technique This method is especially useful when you want a clean, round shape for: Hats and beanies Circular placemats or coasters Mandalas and doilies Round cushions or pillows Plush If your project benefits from a smoother round shape, this trick will improve the overall appearance. Round crochet doily with smooth edges on wooden table Final Thoughts The more crochet techniques you add to your toolkit, the more you refine your skills. Whether a tip is simple or technical, each one helps you grow into the best crocheter you can be — and this little tip is no exception. Learn it, love it, and use it well! #BloggingTheMoon #CrochetTipsAndTricks #PerfectlyRound #TheCrochetedMoon #HandmadeWithLuv #CMcrochetLifestyle
- Crafting a Scenic Chevron Pattern: From Summer Skies to Winter Landscapes
When crafted thoughtfully, a chevron pattern can evoke the feeling of a minimalist landscape, almost like a yarn-made illustration of nature’s layers. This post explores how to create a scenic chevron pattern that captures the essence of changing seasons—from bright summer skies to serene winter landscapes. Mountain Landscape Chevron pattern showing summer landscape colors Understanding the Color Palette and Its Symbolism The key to making a chevron pattern that feels like a landscape lies in the choice of colors and their placement. Each color band represents a different natural element: Light Blue at the top symbolizes the summer sky, bright and clear. Forest Green represents tree-covered mountains, dense and rich. Warm Golden Tan stands for the ground or foothills, dry and sunlit. You can adjust these colors to reflect different moods or seasons: Replace golden tan with sunlit ochre or grassy green for a more vibrant or lush feel. Use light green for meadows that feel fresh and alive. Choose olive to suggest the warmth of late summer. For a winter vibe, swap the colors to: White for snow-covered skies. Dark brown in place of forest green to show bare or snow-dusted trees. Rust orange instead of golden tan to hint at the earth peeking through snow. This flexibility allows you to tailor your chevron pattern to the season or atmosphere you want to evoke. How the Chevron Shape Mimics Natural Landscapes The chevron pattern’s zig-zag shape naturally suggests peaks and valleys, much like mountain ranges. The increases at the peaks and decreases in the valleys create a rhythmic flow that mimics the rise and fall of hills and mountains. When stacked in rows, each color band maintains its shape, giving a clean and graphic look. This structure makes the chevron pattern ideal for representing landscapes because: The peaks can symbolize mountain tops or hills. The valleys suggest lower ground or foothills. The clear separation of colors mimics the layering of sky, mountains, and earth. By carefully choosing where each color band sits, you can create a miniature landscape that feels both abstract and recognizable. Practical Tips for Crafting Your Scenic Chevron Pattern If you want to create your own chevron pattern that captures these natural elements, here are some practical tips: Choose yarn colors thoughtfully. Pick shades that clearly contrast but also complement each other to maintain the graphic look. Plan your row sequence. Start with the sky color at the top, then the mountain color, and finally the ground color at the bottom. Use consistent stitch counts. This keeps the chevron edges sharp and the rows aligned. Experiment with color swaps. Try replacing the golden tan with ochre or grassy green to see how the mood changes. Consider the season. For winter, swap colors as described to create a snowy mountain scene. These steps help ensure your chevron pattern not only looks good but also tells a story through its colors and shapes. Winter-themed Mountain Landscape chevron pattern with snow and mountains Examples of Seasonal Chevron Patterns Here are some examples of how you can adapt the chevron pattern for different seasons: Summer Landscape: Light blue sky, forest green mountains, golden tan foothills. This combination feels warm and inviting, perfect for summer projects. Late Summer Warmth: Light blue sky, olive mountains, sunlit ochre ground. This palette adds a touch of warmth and maturity to the scene. Lush Meadows: Light blue sky, forest green mountains, light green ground. This fresh palette suggests a vibrant, growing landscape. Winter Scene: White sky, dark brown mountains, rust orange ground. This palette evokes a quiet, snowy mountain scene with earth tones peeking through. Each variation tells a different story, showing how versatile the chevron pattern can be. Bringing Your Chevron Landscape to Life To make your chevron pattern truly scenic, consider these finishing touches: Texture: Use yarns with different textures to add depth. For example, a fluffy yarn for the sky can suggest clouds, while a smooth yarn for the mountains keeps them crisp. Scale: Adjust the size of your hook for the "Mountain" section to create larger or smaller chevrons. The smaller looks like distant mountain ranges, while larger ones can feel more like rolling hills. Then switch back to your orginal sized hook for the rest of the pattern. Borders: Frame your pattern with a solid color border to ground the design and give it a finished look. These details help your project feel intentional and polished. Use the Mountain Landscape chevron pattern as wall art showing the four seasons Final Thoughts on Scenic Chevron Patterns Creating a chevron pattern that captures the essence of a landscape is a rewarding way to combine design and storytelling. By carefully selecting colors and understanding how the zig-zag shape mimics natural forms, you can craft a piece that feels like a miniature scene from nature and create your own unique art for your home. #BloggingTheMoon #LearnNewStitches #MountainLandscapePattern #TheCrochetedMoon #HandmadeWithLuv #CMcrochetLifestyle Mountian Landscape Chevron Pattern How to Crochet Row 1 How to Video for Row 1 Mountain Landscape Pattern How to Crochet Row 5 How to Video for Row 5 Mountain Landscape Pattern
- Quick Tip to Stuffing Plush for a Floppy Head-Free Experience
Stuffed plush toys are beloved for their softness and charm, but a floppy head can quickly turn a cuddly companion into a limp disappointment. If you’ve ever struggled with a plush head that just won’t stay upright, you’re not alone. The key to a sturdy, well-shaped plush lies in how you stuff the neck area. This guide will walk you through practical steps to stuff a plush neck so the head stays firm and upright, making your plush look and feel its best. Stuffing a plush neck with fiberfill to prevent floppy head Why Plush Heads Become Floppy A floppy plush head usually happens because the neck area lacks enough stuffing or support. The neck is a narrow part connecting the head to the body, and if it’s too soft or underfilled, the head will flop forward or sideways. This can happen even if the rest of the plush is well-stuffed. The neck needs a firm core to hold the head in place without making it stiff or unnatural. Choosing the Right Stuffing Materials The type of stuffing you use affects how well the neck supports the head. Common stuffing materials include: Polyester fiberfill: Soft, lightweight, and easy to shape. Ideal for most plush projects. Foam inserts: Provide firm support but can be bulky or hard to shape. Plastic pellets: Add weight and stability but are usually used in the body rather than the neck. Pipe cleaners, wire, or wooden dowels: Can be used inside the neck for adjustable support but require careful sewing to avoid poking through. For a balance of softness and support, polyester fiberfill combined with a small internal structure works best. Step-by-Step Guide to Stuffing the Neck Follow these steps to stuff the neck properly and keep the plush head from flopping: Prepare the plush Before stuffing, turn the plush right side out and check the neck opening. Make sure the seams are secure and there’s enough room to work inside. Start with a firm core Take a handful of stuffing and pad the bottom of the plush. Repeat pressing firmly and gently shaping until you reach the lip of the neck. Insert the core into the neck If you need extra support, now is the time to insert the support core (pipe cleaner, wire, dowel). Push the support core into the neck opening, down through the center of the body being careful to not poke through the bottom of the plush. Add more fiberfill around the core Gradually add loose fiberfill around the core, filling the neck until it feels firm but still flexible. Avoid overstuffing, which can stretch the fabric or distort the shape. Check the head position Stuff the head the same was as the body. If you're using a support core, gently place the head over the top of the core sticking up from the body, position the head, and then start sewing the head to the neck area. Close the neck opening Here is the quick tip I learned whether using a support core or not to help keep the neck firm. Watch the video below to discover the trick. Once you're happy with the stuffing, sew the neck opening shut using small, tight stitches. This ensures the stuffing stays in place and preserves the neck’s shape. Quick stuffing tip for a firm neck Tips for Extra Support Use a small piece of felt or fabric tube inside the neck to hold the fiberfill core in place. Add a thin wire or pipe cleaner wrapped in fabric for adjustable firmness. Use a sturdy wooden dowel near the neck joint to balance the weight. Crochet a shorter neck or no neck eliminating a weak point on the plush. Avoid stuffing the neck too soft; even with the extra support you should always firmly stuff your plush like pillow, not a loose sack. Common Mistakes to Avoid Under stuffing the neck: Leads to floppy heads and weak support. Overstuffing the neck: Can stretch seams and make the neck look unnatural. Ignoring the head weight: Heavier heads need firmer neck stuffing or internal support. Skipping the core: A simple fiberfill core inside the neck makes a big difference. Final Thoughts on Stuffing Plush Necks Experimentation is crucial in any creative process. If one approach doesn't suit you, try another, and you'll eventually resolve your floppy head issue. Happy Stuffing! #BloggingTheMoon #CrochetTipsAndTricks #GoAwayFloppyHead #TheCrochetedMoon #HandmadeWithLuv #CMcrochetLifestyle
- Brighten Her Summer Wardrobe with Unique Handcrafted Pieces and Stylish Sun Protection
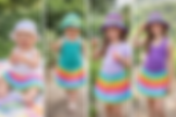
Summer calls for clothing that combines comfort, style, and practicality. For parents looking to refresh their little girl’s wardrobe with pieces that stand out and keep her protected from the sun, two items deserve attention: the Girl's Rainbow Sprinkles Skirt and the Play N' Go Children's Sunhat. Both are designed with care, made from quality materials, and perfect for active summer days. This post explores why these handcrafted and thoughtfully designed items are must-haves for your child’s summer collection. Handmade Girl's Rainbow Sprinkles Skirt, with vibrant shell pattern, paired with Child's Play N'Go Sunhat. The Charm of the Girl's Rainbow Sprinkles Skirt The Girl's Rainbow Sprinkles Skirt is more than just a piece of clothing. It’s a celebration of summer fun and creativity. Handmade with a lively shell pattern, this skirt uses variegated yarn that ensures every piece is unique. No two skirts are exactly alike, making it a special addition to her wardrobe. Comfort Meets Craftsmanship & Versatility This skirt is designed to keep your child comfortable during playtime, family outings, or casual summer events. The cotton material allows air to circulate, preventing overheating while the adjustable cord makes it easy to wear and adjust. 100% cotton fabric: Soft, breathable, and perfect for warm weather. Handmade quality: Each stitch reflects care and attention. Adjustable cotton cord: Ties in the front for a perfect fit as she grows. Whether she’s running around the park, attending a birthday party, or enjoying a family picnic, this skirt fits the bill. Its playful pattern adds a splash of color to any outfit and pairs well with simple tops or matching accessories. Practical and Stylish Sun Protection with Play N' Go Children's Sunhat Sun safety is a priority during summer, especially for children who spend hours outdoors. The Play N' Go Children's Sunhat offers a practical solution without compromising style. Mercerized cotton: Durable and easy to clean, perfect for active kids. Three vibrant colors: Options to match different outfits and moods. Low maintenance: Toss it in your bag and wash it easily after a day of fun. This sunhat protects delicate skin from harmful UV rays while adding a cute touch to her look. Its lightweight design makes it comfortable to wear for long periods, whether at the pool, playground, or beach. Features That Make a Difference Both the skirt and sunhat share qualities that make them ideal for travel and poolside fun: Easy care: Both items are machine washable and dry quickly. Lightweight and packable: They take up little space in a travel bag. Durable materials: Designed to withstand active use and frequent washing. Parents appreciate clothing that can keep up with busy schedules and spontaneous adventures. These pieces require minimal fuss, so you can focus on enjoying the summer with your child. Styling Tips to Brighten Her Summer Look Pairing the Rainbow Sprinkles Skirt and Play N' Go Sunhat creates a coordinated and cheerful outfit. Here are some ideas to make the most of these pieces: Combine the skirt with a plain white or pastel-colored top to let the pattern shine. Match the sunhat color with shoes or accessories for a polished look. Add simple sandals or sneakers for comfort and style. Layer with a lightweight cardigan for cooler evenings. These tips help create outfits that are both practical and visually appealing, perfect for capturing summer memories. Final Thoughts on Summer Wardrobe Essentials Making sure your family has fun and looks fashionable doesn't have to be a challenge, even if you have a hectic schedule. The Crocheted Moon can help you keep a stylish look while enjoying the summer! #BloggingTheMoon #InspiredConnections #GirlsRainbowSprinkleSkirt #ChildrensPlaynGoSunhat #TheCrochetedMoon #HandmadeWithLuv #CMcrochetLifestyle
- Create a Stunning Crocheted Work of Art with the Tile Motif Pattern
Crocheting offers endless possibilities for creating unique textures and designs. One pattern that stands out for its sculptural quality and visual interest is the tile motif pattern. This pattern features a repeating tile-like motif arranged in staggered oval-shaped rows using four different colors. The result is a raised, dimensional fabric that looks almost like a mosaic. If you want to elevate your crochet projects with a design that combines color play and texture, this tile motif pattern is an excellent choice. Close-up of crocheted tile motif pattern with four colors Understanding the Tile Motif Pattern The tile motif pattern is built around a repeating unit that resembles a tile or oval shape. These motifs are worked in rows, but instead of lining up directly, they are staggered to create a dynamic, interlocking effect. The use of four colors adds depth and complexity, making the fabric appear almost three-dimensional. Key Features of the Pattern Repeating tile-like motifs: Each tile is an oval shape with raised texture. Four-color arrangement: Colors alternate in a specific sequence to enhance the mosaic effect. Staggered rows: Tiles in one row are offset from the tiles in the row above and below. Raised texture: The stitches create a sculpted surface that stands out from the background. This combination of features makes the pattern ideal for projects where you want a bold visual impact, such as blankets, cushions, or wall hangings. Choosing the Right Yarn and Hook To bring out the texture and color contrast in the tile motif pattern, selecting the right yarn and hook size is essential. Yarn type: Use a smooth, plied yarn that shows stitch definition clearly. Cotton or cotton blends work well because they hold shape and texture. Weight: A medium worsted weight yarn (category 4) balances ease of handling with visible texture. Colors: Pick four colors that contrast but complement each other. For example, a palette of teal, mustard yellow, coral, and cream creates a warm yet vibrant look. Hook size: Use the recommended hook size for your yarn, usually 5.0 mm or H-8 for worsted weight. Adjust if you want a tighter or looser fabric. Choosing yarns with a slight sheen can also enhance the mosaic effect by reflecting light off the raised stitches. Step-by-Step Guide to Crocheting the Tile Motif Here is an overview of how to create the tile motif pattern. For detailed stitch instructions, refer to the attched pattern and related how-to videos. ROWS 2 & 3 ROWS 4 & 5 ROWS 6 & 7 ROWS 8 &9 Tips for Working with Multiple Colors Managing four colors in one project can be tricky but rewarding. Here are some tips to keep your work neat and enjoyable: Use bobbins or small yarn balls for each color to avoid tangling. Carry yarn along the back when not in use, catching it with stitches to keep tension even. Weave in ends as you go to prevent a large pile of loose ends at the end. Plan your color order before starting to maintain consistency. Practice color changes on a small swatch to get comfortable with switching smoothly. These strategies help maintain the clean, mosaic look of the tile motif. Colorful crocheted tile motif showing raised oval shapes in four fun pastel colors Project Ideas Using the Tile Motif Pattern The tile motif pattern works well for a variety of projects where texture and color are key. Blankets and throws: The raised texture adds warmth and interest, making cozy statement pieces. Cushion covers: Use the pattern on one or both sides for decorative pillows. Wall hangings: Create a framed crochet art piece that showcases the mosaic effect. Bags and totes: Add texture and color to accessories with this pattern. Scarves and shawles: Show off by creating a wearable art piece. Because the pattern is modular, you can adjust the size easily by adding or subtracting tile repeats. Caring for Your Crocheted Tile Motif Work To keep your crocheted piece looking its best: Hand wash or use gentle cycle with cold water to protect the yarn and texture. Lay flat to dry to maintain shape and avoid stretching. Avoid heavy ironing; if needed, use a low heat setting with a cloth barrier. Store flat or rolled to prevent creases in the raised stitches. Proper care preserves the dimensional look and vibrant colors of your work. Draped mosaic tile motif afaghan showing three colors Concluding Remarks on the Tile Motif Design The Tile Motif pattern is one of those unique designs that seems endlessly versatile—not due to its simplicity, but because its structure is so thoughtfully balanced. The repeating shells establish a rhythm that works at any scale—from tiny accessories to large blankets, home décor, and garments. It never appears out of place because the motif is both structured and soft. With each row being a self-contained band of texture, the pattern serves as a canvas for color experimentation. It’s a pattern that feels handmade without appearing rustic, structured without seeming rigid, and colorful without becoming overwhelming. This balance is what allows it to transition so effortlessly. #BloggingTheMoon #LearnNewStitches #TileMotifPattern #TheCrochetedMoon #HandmadeWithLuv #CMcrochetLifestyle
- Effortless Crafting: Quick Tips for Seamless Plush Assembly
Crocheting is a rewarding hobby that lets you create cozy, beautiful items with your own hands. Yet, one part of the process often slows down the joy: sewing pieces together. Extra sewing can feel tedious and time-consuming, pulling you away from the fun of crafting. What if you could say goodbye to extra sewing and hello to seamless crafting? This post shares a quick tip designed for easy assembly, helping you spend more time enjoying your crochet projects and less time stitching them together. Plush used with the Seamless Assembly Technique Why Seamless Assembly Matters When you finish crocheting individual pieces, like plush the next step is sewing on the different pieces, such as arms, legs, noses, ect..., using the traditional sewing method of threading needles, aligning pieces carefully, and stitching them in the right place. This can be frustrating, especially if you want your project to look neat and professional. Seamless assembly techniques eliminate the tediousness of traditional hand sewing. This means your finished piece looks neater, better alignment, and holds together better. Plus, it cuts down on the time you spend sewing, so you can focus on what you love: creating. The Quick Tip for Easy Crochet Assembly The key to seamless assembly lies in joining your pieces as you crochet, rather than after. This method is often called join-as-you-go (JAYG). Instead of finishing the main body of your plush and then sewing them, you connect each new piece directly to the previous round as you crochet. This method can be used to attach any part directly to the main body of your plush. You have the option to pinch the two sides of the piece you are joining together and crochet through both simultaneously, or you can first crochet across the bottom stitches and then crochet across the top stitches of the piece in the next row. To achieve this, keep the current loop on your hook, insert the hook through the chosen stitch of the piece you're attaching, and then through the next stitch on the body. Repeat this process until you have crocheted across all the stitches of the piece you are joining. In the video demonstrating how to attach the arms, you'll observe me crocheting through both sides simultaneously to secure them to the body. In the video for the nose, you'll discover how to crochet across the bottom first, followed by the top. Watch the video below to learn how to apply this technique in your next project: How to attach arms How to attach a nose Benefits of Join-As-You-Go Saves time by combining joining and crocheting steps. Improves durability because the pieces are connected securely. Enhances appearance with neat, invisible joins. Reduces frustration from sewing and pinning pieces together. Troubleshooting Common Issues Edges don’t line up: Count stitches carefully before joining. Use stitch markers to match corners. Seams look bulky: Use smaller hook sizes for joining rounds or try slip stitches instead of single crochet. Joining feels tight: Loosen your tension slightly on the joining round to keep fabric flexible. The Making of Amoretti Gnome with the "join-as-you-go" method Final Thoughts on Seamless Crochet Assembly Seamless crochet assembly transforms your crafting experience. By using the join-as-you-go method, you reduce extra sewing, speed up your projects, and create polished, professional-looking pieces. This quick tip helps you focus on the joy of making, not the hassle of stitching. Try this technique on your next project and see how much easier and more enjoyable crochet assembly can be. Your cozy creations will come to life faster, with smooth joins that feel as good as they look. #BloggingTheMoon #CrochetTipsAndTricks #JoinAsYouGoMethod #TheCrochetedMoon #HandmadeWithLuv #CMcrochetLifestyle
- Experience the Enchantment of the Woodland Fairy Festival at Gardner Village This Spring
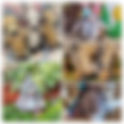
Step into a world where magic hides in every corner and tiny fairies invite you to explore their secret homes. This spring, Gardner Village transforms into a fairy-tale setting with the Woodland Fairy Festival, a unique event that offers visitors a chance to escape the ordinary and discover enchantment in the heart of the city. Whether you are a family looking for a whimsical day out, a nature lover eager to explore charming gardens, or someone who enjoys unique shopping and dining experiences, this festival has something special for you. Woodland Fairy Festival at Gardner Village in West Jordan, Utah Discover the Hidden Fairy Forest Gardner Village’s Woodland Fairy Festival invites you to wander through its woodland gardens, where fairies live in tiny, beautifully crafted houses. These miniature homes are tucked away in nooks and crannies, waiting to be found by curious visitors. The festival encourages exploration and imagination as you search for fairy doors and bitty scenes that bring the fairy world to life. Enjoy Shopping and Dining in a Charming Setting Gardner Village is known for its quaint boutiques and unique shops, and the Woodland Fairy Festival enhances this experience with a magical twist. As you explore the village, you can browse stores filled with handcrafted goods, fairy-themed items, and local artisan products. This is a perfect opportunity to find gifts or souvenirs that capture the spirit of the festival. Forget-Me-Not Finds @ Gardner Village Forget-Me-Not Finds is among the charming shops listed earlier, and it's the place to discover handmade treasures from The Crocheted Moon, showcasing our exclusive faerie collection. To see all the current on hand items in The Crocheted Moon booth you can click here to see our current gallery selection: When hunger strikes, the village offers several gourmet restaurants and confection shops. You can choose from Archibald's, Happy Camper Deli and Bakery, or dinner and show with Mystique Dinning. And popping in at the Cover Wagon always results in sweets that delight. Imagine savoring a delicious meal surrounded by the charm of the village and the gentle presence of fairy decorations. Fine dinning at Archibald's Restaurant Experience Unique Activities for All Ages The Woodland Fairy Festival offers more than just sights and shopping. Visitors can take part in a fairy escape room adventure, a fun and engaging activity that challenges you to solve puzzles and uncover secrets in a magical setting. This experience is great for families, friends, or anyone who enjoys interactive games. For those seeking relaxation, the village spa provides a peaceful retreat. After exploring the fairy forest and enjoying the festival’s activities, a spa visit offers a chance to unwind and refresh. Combining the magic of the festival with self-care creates a well-rounded day of enjoyment. Plan Your Visit to the Woodland Fairy Festival The festival runs from May 16 to June 27, 2026, giving you plenty of time to plan a visit. Gardner Village is easily accessible and offers parking options for guests. To make the most of your experience, consider these tips: Wear comfortable shoes for walking through gardens and village paths. Bring a camera or smartphone to capture photos with fairy wings and tiny houses. Check the festival schedule for special events or workshops. Visit the boutiques early to find unique items before they sell out. Reserve a spot for the escape room or spa treatments in advance. Life-size fairy wings for visitors to wear and take photos at Gardner Village The Woodland Fairy Festival at Gardner Village offers a magical escape that blends nature, creativity, and community. It invites you to slow down, explore, and enjoy moments of wonder with family and friends. Whether you come for the fairy houses, the shopping, the dining, or the special activities, you will leave with memories of a charming and enchanting spring day. #BloggingTheMoon #CMupdates #WoodlandFairyFestival #TheCrochetedMoon #ForgetMeNotFinds #GardnerVillage